How to Make a Beaded Ring

Express Yourself - Make a Beaded Ring!
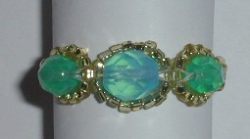
Beaded rings are artsy and individualistic. They express your style in a personal way that you won't get from a more conventional ring. Plus, beaded rings are fun to make. The ring in this photo is made from faceted glas beads, but you could just as easily use your favorite gemstones to create a treasure that is valuable as well as beautiful. I like how beaded rings work up quickly (make one in about half an hour) and how you can make them in colors you wouldn't normally be able to find in a ring.
Beaded Ring Overview
This is an easy yet lovely beaded ring. The pattern accommodates just about any size of beads. The ring is slightly more challenging than the Hugs & Kisses ring, but also more adaptable. The technique is useful to learn for encircling large beads for other types of jewelry, too.
Beaded Ring Materials
1 or more focal beads
The diagram is for three beads on the top of the ring, but you could easily use only one or two beads or continue the pattern for the entire ring. It's your choice! The ring in the photo was made using two 6-mm Czech firepolish beads and one 8-mm Czech firepolish bead. Round or oval shapes work best. Use smooth beads or those with flat sides or facets.
Seed Beads
I used size 11 Matsuno seed beads. Size 14/15 are also very nice, as are Delicas. You could surround a single large focal bead with larger seed beads, such as size 10s or even 8s.
Beading Thread
I used 10-lb Power Pro. Nymo works well too, as does most nylon fishing line.
Beading Needles (Optional)
I used size 10 beading needles, but you may prefer working without needles, especially if you use monofilament nylon line.
Scissors
Measuring Tape or Ring Mandrel
I just made the ring to fit my finger, so I didn't actually measure it. You will want a measuring tape if you are making the ring for someone else.
Beaded Ring Step 1:
Cut about a meter of your preferred stringing material. It will be more than you will need, but it's nice to have extra length in case you choose to reinforce your stitching. First, make the top of the ring. After this is completed, the back of the ring is stitched and connected to the starting section. String an odd number of beads sufficient to encircle your first focal bead. (Keep in mind: In a later step, you will be adding one more bead to complete the circle.) If you use too few beads, the seed beads will pull underneath the ring when you wear it. If you use more beads than necessary, then there will be some open space between the seed beads and the focal bead in the finished ring (could be a design element, perhaps). Seven beads are shown in the diagram. That's probably a reasonable number of size 11 beads to encircle a 4-mm bead. I needed thirteen Matsuno size 11 to go around a 6-mm Czech firepolish bead. This will result in one seed bead at each end, with 6 beads on either side of the focal bead. Once you have the proper number of seed beads, allow all of the beads to slide to the center of your thread.
Beaded Ring Step 2:
String both ends of the thread through the same side of your first focal bead. Now, pass one thread through half of your seed beads (not the middle seed bead), going in the same direction as the original thread. Pass the other thread through the other half of the seed beads (not the middle seed bead). Adjust the tension so that the focal bead sits snugly in the seed bead loop that you have just created. Cross the thread through a new seed bead (i.e., pass each thread through a seed bead from opposite side). Whenever you cross the thread in a bead, avoid splitting the thread (only a potential problem with a braided or multifiber thread, not monofilament).

Beaded Ring Step 3:
String a sufficient number of beads on each string to encircle your second focal bead. If your focal beads are all the same size, then make the number correspond to what you used for the first focal bead. I used eight Matsunos on each side for an 8-mm Czech firepolish bead. As you did with the first focal bead, run the ends of both strands through the same side of the focal bead and pass them through all of the seed beads around this focal bead, except for the 'odd' seed bead shared by the circles around both focal beads.
Learn to Make More Beaded Rings


Beaded Ring Step 4:
Cross the threads through a new seed bead. String seed beads on each side, to match your first focal bead (assuming the first and third are the same size).
Beaded Ring Step 5:
You're probably seeing a pattern by now... enter the third focal bead with both threads entering from the same side. Pass back through all but the cross-over seed bead. Cross through a new seed bead. Add a seed bead to each thread and cross through a new bead. Add a bead to each side and cross through a new bead. Continue until the desired length is reached.
Beaded Ring Step 6:
To end the ring, make the 'odd' bead from the first step your crossover bead. Be careful not to twist the ring band. If you feel adventuous, perhaps you could embellish the circles around the ring using peyote stitch, using the existing beads as the first/second rows. Alternatively, it's possible to work netting patterns around the simple design shown here.

Beaded Ring Step 7:
Tie a knot, string through a portion of the pattern, tie a knot, cut your thread. I like to reinforce the beadwork all the way through the ring. If you do this, be forewarned that it will tighten the ring slightly and reduce its size. I don't glue my final knot using Power Pro, but I probably would with nymo or with nylon fishing line. Here's a diagram of the entire pattern, laid out end-to-end. As always, your actual bead count will depend on the size of beads you are using, thread tension, and the size of your finger (or perhaps toe). Enjoy!
Find Beaded Ring Supplies Online