Make a Victorian Wirework Necklace

Learn a Victorian Jewelrymaking Technique
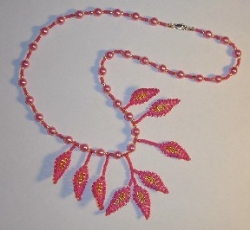
This autumn leaf necklace is stunning! The Victorian technique for making leaves can be used to make other shapes and sizes of leaves, feathers, and flowers.
Victorian Wirework Necklace Overview
Although this design looks complex, a beginner can achieve it. This is a simple bead stringing project with some basic Victorian wirework. First, all of the leaves are made. Wrapped loops are made with the wire stems of the leaves. The leaves and other beads are strung onto the necklace. I have strung this necklace on beading cord with bead tips (instructions included), but you may prefer the stiffness of beading wire with crimp beads.
Victorian Wirework Necklace Materials
I listed the exact materials I used, but of course you can make substitutions. String the necklace with beading wire and crimp beads or else with a substantial beading cord with bead tips. Inexpensive beads actually work better than expensive seed beads because they tend to be rounder and easier to work with the wire.
Beading Wire - 24-32 gauge
Matte Hot Pink 11/0 Seed Beads - Rounded, not cylinder. I used Matsuno.
Matte Fuchsia 11/0 Seed Beads - Rounded, not cylinder
Silverlined Gold 11/0 Seed Beads - Rounded, not cylinder
Stringing Material - Size 3 White Silkon
Accent Beads - 6-mm Hot Pink Pearls
Wire Cutters - Flush cutters preferred
Round Nose Pliers - Used for making wrapped loops
Flat Nose Pliers or Chain Nose Pliers - For closing bead tips
2 Bead Tips - Use crimps if stringing on wire
Clasp - Goldfilled Lobster Claw
Find Materials for this Necklace
You can find the materials to make this necklace at pretty much any craft store. Otherwise, beads, wire, and tools are available online.

Victorian Wirework Necklace Step 1:
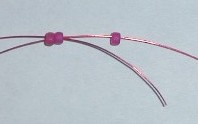
First make the leaves. Each leaf is made using an easy Victorian ladder stitch. Start by cutting approximately 1 foot (30 cm) of beading wire. I used 28 gauge red enameled wire from Radio Shack. String 3 dark color (fuchsia) beads onto the end of the wire. Cross the other end of the wire through the two end beads, as shown in the diagram. Tighten the wire to form a small triangle in the middle of the wire. To complete the leaf, you will use this same crossing action, except you will cross through all of the beads you pick up. I find this easiest to do by putting the new beads on the end of the wire held in my non-writing hand, crossing with the wire held in my dominant hand, and then tightening the row of beads. You may find another method works best for you. If you tighten the beads strongly the rows will start to curl. Ease your wire tension for leaves that will lay flat.
Victorian Wirework Necklace Step 2:
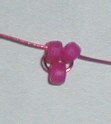
This is the small triangle formed by the first three beads, forming the tip of the leaf. This completes the first 2 rows of the leaf. Here is the pattern for the leaf, where D = dark color (fuchsia), L = light color (hot pink), G = gold (silverlined gold):
1 D
2 D
1 D, 1 L, 1 D
1 D, 2 L, 1 D
1 D, 1 L, 1 G, 1 L, 1 D
1 D, 1 L, 2 G, 1 L, 1 D
1 D, 1 L, 3 G, 1 L, 1 D
1 D, 1 L, 3 G, 1 L, 1 D
1 D, 1 L, 2 G, 1 L, 1 D
1 D, 2 L, 1 D
2 D
You have completed rows 1 and 2, so pick up 1 dark bead, 1 light bead, and 1 dark bead. Cross through all three beads and tighten this row over the two dark beads from row 2. Complete the pattern to make a leaf.
Victorian Wirework Necklace Step 3:
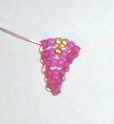
I've included a photo of a half-finished leaf. Once you have finished a leaf, use your fingernails to push the wire ends together over the final 2 dark beads. Make as many leaves as desired for your necklace. My necklace has 9 leaves.
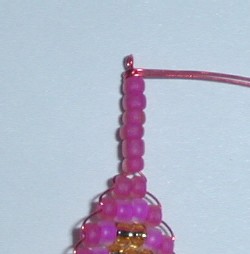
Victorian Wirework Necklace Step 4:
I added 6, 9, and 12 beads to the leaf wires to make the stems of the leaves, then made a wrapped loop so that the leaves could be strung on a necklace like beads. In addition to playing with the lengths of the stems of the leaves, you can also corkscrew them around a small rod to make 'vines'.
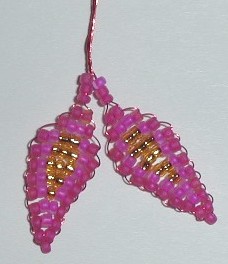
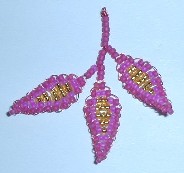
Victorian Wirework Necklace Step 5:
The centerpiece of my necklace is a three-leaf pendant. First, the leaves were made. I added three dark beads to the stems of two leaves and tightly twisted the leaves together several times. I added 3 beads to the leaf-pair and trimmed some of the excess wire to reduce their bulk.
Books About Wirework
Victorian wirework is just one type of wirework used to make jewelry. Here are some books to give you ideas for other beautiful wire creations.
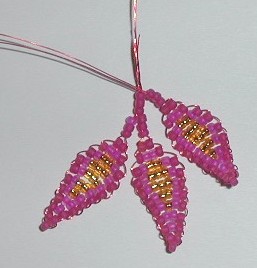
Victorian Wirework Necklace Step 6:
Three beads were placed on the stem of the third leaf and then it was twisted together with the leaf-pair. Again, excess wire was trimmed to reduce the bulk of the wire.
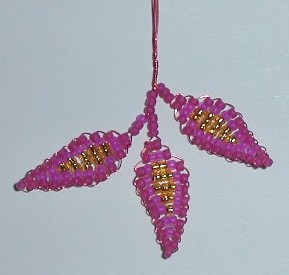
Victorian Wirework Necklace Step 7:
Six beads were added to the top of the branch. A wrapped loop was made at the top and the wires were cut.
Victorian Wirework Necklace Step 8:
Here's the completed branch. These leaves and the single leaves can be bent into any shape. Heavier wire will result in stiff leaves. Fine wire makes it easier to produce branches and the individual leaves will be more flexible, but the leaves will not be as strong.

Victorian Wirework Necklace Step 9:
The necklace was made by stringing a repeating pattern of 3 dark, 1 gold, 1 6-mm hot pink pearl, 1 gold until it was long enough to reach the front of the neckline. Then the pattern becomes dark, leaf, dark, gold, pearl, gold. The original pattern is continued after the leaf section is completed. Other design possibilities include using crystals instead of pearls, varying the number/shape/size of the leaves, or adding in flower or berry components. Here are instructions for stringing a necklace using bead tips and adding the clasp.
Video Showing How to Attach a Clasp
If you are new to beading, you might be wondering exactly how you can attach a clasp to your necklace.
Questions or comments about this Victorian wirework project?


