Make Pearl Earrings

Make Classic Pearl Earstuds Yourself
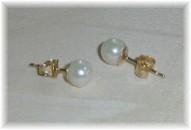
Pearl earstuds are a classic fashion accessory, jewelry store staple, and a great gift idea. High quality materials and careful attention to technique will make the difference between heirloom treasures and earstuds that look ill-matched and fall apart.
Pearl Earrings - Project Overview
The key to making great pearl earstuds is to make sure the pearls and their settings (the studs) 'go' together. Also, you need to use an adhesive that is up to the pulling and tugging that the earrings are likely to endure. Let's talk about the pearls first. You can get freshwater, saltwater, or faux pearls. These pearls are available undrilled or half-drilled. The pearls could be round, 3/4 round, flat on one side, or really any shape. The stated size of the pearls is their maximum diameter in millimeters. You want pearls that have the same size, quality of surface/nacre, and shape. It is quite a challenge to get natural or cultured pearls that are perfectly matched! How well the pearls are matched will affect the symmetry of the earstuds and their value. If you can, try to match your own pearls. For pearls with a flat side, make sure the thickness of each pearl in a set is the same. If the pearls are drilled, try to get pearls with drill holes located in the same places (often not the exact center of the flat spot, as you can see in my photo below).
The value of the earrings is also affected by the metal used for the earstuds. Common choices include solid (various) karat gold, solid sterling silver, goldfilled, plated with gold or silver over a base metal, or surgical stainless steel. When you purchase earstuds, the earnuts (parts that secure the earring on the ear) may or may not be included. Earnuts are available in all of the metals listed above as well as rubber and silicone and in a variety of styles. Match the quality of your metal to the quality of your pearls.
If your pearls are flat you will want a flat pad earstud. If they are drilled (a nice option that makes the pearl more secure in its setting), you will need an earstud with a peg. Buy flat pad earstuds that are just slightly smaller in diameter than your pearls (e.g., use a 6-mm pad for a 6.5 to 7 mm pearl). Pearls tend not to be perfectly round, so if you buy a pad that is the same size, you may see 'setting' in the finished earring. If the pad is too small, the pearl will be less secure and liable to come off of its setting. If the pearls are rounded (anything other than perfectly flat on one side), choose a cup style earstud. If the pearls are drilled, buy cups with pegs. If the pegs are too long for your pearl to rest in the base (test this before cementing), you will need to use a metal file to shorten them. The cup diameter needs to be smaller than the pearl diameter, usually 1 or 2 millimeters smaller than the pearl diameter. I would not use a Snap-Tite setting for pearls - they will be scratched by the prongs. Other safe and secure settings exist, but special instructions are required for their proper use.
Pearl Earrings Materials List
Pair of Matched Pearls
Match them yourself, if you can.
Earstuds
Metal? Size? Cup or flat? Peg? All important considerations.
Earnuts
Matching metal or synthetic comfort grips
Jeweler's Adhesive
I use E6000 or Goop
Toothpick
Or other fine-tipped tool
Skill Level
suitable for beginners
Time Required
minutes to make; allow at least a day for the adhesive to cure
Pearl Earrings - Step 1
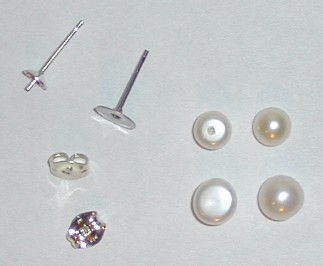
Here's a photo of drilled and undrilled pearls. I've also shown a flat earstud (surgical stainless steel), a cup-and-peg earstud (sterling silver), and some sterling silver earnuts. Once you have the pearls and setting selected, you need to choose an adhesive. It needs to be waterproof, flexible, non-damaging to the nacre, provide a secure pearl/metal bond, have minimal shinkage upon curing, and preferably be clear-drying. There are several options available. I use E6000 or Goop adhesive/sealant. The vapors are toxic, so cementing and curing the earstuds should be performed in a well-ventilated room. Here's what you do:
Check each pearl to make certain it is larger than the pad/cup and that the peg, if present, fits the pearl. Basically, assemble your earstuds without cementing them. If everything looks okay, proceed to the next step.
Pearl Earrings - Step 2
Put a small blob of adhesive on the end of a toothpick (unless you are using an adhesive that has a micro-applicator) and apply the adhesive to the center of the cup or pad. Spread it out a bit so the entire center of the cup or pad is covered, about 3/4 of the way to the edge.
Pearl Earrings - Step 3
Set your pearl onto the cup or pad. Apply a small back/forth rocking action to make sure it is securely seated. The pressure of setting the pearl should push the extra adhesive toward the edge of the cup or pad. You can use a piece of paper towel to remove any excess. You want a continuous circle of adhesive between the bottom of the pearl and its base to seal the pearl to its setting. You don't want a goopy mess on your pearl.
More About Pearls and Earrings
If you are enjoying this lens, you might want to try some of my other pearl jewelry projects and earring projects.
- Make Beaded Earrings Using the Coraling Technique
These lacy earrings look like coral or frost. The branched fringe or coraling beading technique is easy to do and yields stunning results. Once you master the stitch you can use it to make necklaces or to adorn clothing. - Make a Pearl Illusion Necklace
This illusion necklace looks beautiful and requires no knots, glue, or crimps to hold the beads in place. Try it with pearls or accent beads that would be too heavy to use as a full strand. I have shown it as a pearl necklace, with the example done u - Bead a Pearl Lariat Necklace
A long rope necklace or lariat is among the most versatile of accessories. You can wear it as a long necklace or belt or wrap it up for more fashion options. Pearl ropes are classic and elegant. A beaded sautoir is reminescent of the 1920s. Use moder - How to Tell Real Pearls and Fake Pearls Apart
Pearls are beautiful. There are faux (fake) pearls that look stunning and real pearls that look... well... less so. So why care whether or not you can tell real and fake apart? You will want to be able to recognize real pearls if you are buying them - Make Beaded Chandelier Earrings
Chandelier earrings are gorgeous, but large earrings can be heavy and cumbersome and can take a lot of time to make. These earrings have three-dimensional drape and the swingy allure of chandeliers, but they are easy to make and elegant enough to wea
Pearl Earrings - Step 4
Allow the adhesive to cure in a well-ventilated, warm area. Curing an adhesive means that you give the bond time to form and you allow the various fumes to dissipate. One of the vapors given off by sealants is from acetic acid (a component of vinegar). If your sealant is still off-gassing and you close your earstuds in a sealed area (e.g., a plastic bag), then you risk damage to the nacre of the pearl and corrosion of the setting. The rate of curing is dependent on temperature, so the bond will be formed more quickly at normal room temperature than at a cool temperature. The curing conditions are generally stated on the adhesive label.
Pearl Earrings - Step 5
Once the curing process is complete, your pearl earstuds are ready to wear or package. Enjoy! You can use the same process to make other types of earstuds. Be careful selecting your adhesive, though, since some materials or their backings may be incompatible (e.g., get ruined!) using certain cements. Always read the label on the adhesive before using it.
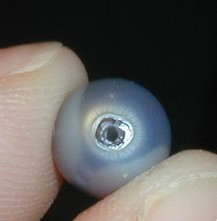
Cover the Drill Hole!
Here's a photo of a perfectly round pearl, with an extra-closeup of its drill hole. You can see the layer of nacre and the start of the bead or shell 'seed' when you look at the drill hole of glass pearls and cultured pearls with very thick nacre. This area is delicate and should be completely covered/protected by the cup of a cup-and-peg earstud
Make More Pearl Jewelry

Here's the place for them! Please sign my pearl earrings guestbook.


