Make Chandelier Earrings

Make Your Own Chandelier Earrings
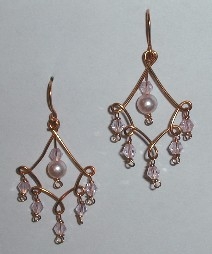
Chandelier earrings are gorgeous! These instructions are for completely hand-made earrings. Use a jig or roundnose pliers to make the chandelier frame. The dangles are attached to the frame use wire or headpins. Finally, the chandelier is hung from an earring finding, which, of course, you can make too!
Chandelier Earring Materials
Wire
I prefer 20 or 21 gauge wire (metric equivalents here) for the earwire and chandelier frames, then use 24 gauge wire to attach the dangles using wrapped loops (you could use headpins or eyepins instead). If you attach the dangles using simple eye loops, use a thicker wire, such as 20 or 22 gauge. The earrings in the photos were made with clear-coated copper wire (dead soft) and with a combination of square and round sterling silver wire (full hard). It's easier to get a perfect shape using softer wire, but really any wire you have can be made to work. If you have some, I highly recommend using square wire for the chandelier frame. This wire really shines!
Beads
The size you choose will depend on the size you make your chandelier frame. I used twelve 3 or 4 mm Swarovski crystals and two 6-mm glass pearls.
Jig
Most jigs can be used to make the diamond shape used in this design. You can make your own jig, too. It's possible to make the form using only roundnose pliers, but harder to make a regular shape. I used Wig Jig's Delphi model. If you are using an inexpensive plastic jig (as opposed to metal or thicker acrylic), you may need to use soft wire, since pulling hardened wire under tension could break a lighter jig.
Flatnose or Chainnose Pliers For attaching pieces to each other.
Roundnose Pliers
For making loops to attach dangles.
Anvil/Mallet
Optional. I like to hammer the earwires, but I didn't harden or flatten the chandelier component. An alternative to using an anvil is to squeeze down on the piece using flatnose (chainnose) pliers. You could also use a hammer and a block of wood or smooth concrete.
This is an easy project, but it does combine multiple wireworking skills. If you are new to wirework, either try the project using inexpensive materials or else practice making loops and using a jig before making the earrings. Alternatively, any of the findings used in chandelier earrings can be purchased (earring findings, chandelier frames, even dangles), so all you would need to do is assemble the pieces.
Chandelier Earrings Step 1:
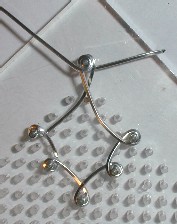
First select your beads and set up your jig to make the chandelier frame. I made a diamond shape, elongated on the end that will have the earring. My diamond was large enough for an inner dangle to fit inside. Try setting your beads around your design to get a feel for the space that will be taken by the components. My diamond uses 7 pegs, and allows for 5 bottom dangles. It's just as easy to make a diamond using 3 or 7 bottom loops, so feel free to experiment! If you have a circular jig, like Wig Jig's Cyclops, then you can make a smooth curve along the bottom between the loops.
Chandelier Earrings Step 2:
Start wrapping wire around the pins of the jig from the top (where earring will attach), working your way around, and making another wrap around the top pin. Pull the wire as you wrap it and push it down toward the pins between loops. Consistent tension is the key to nice shape. Cut the wire and remove the chandelier from the jig. When you cut the wire it will spring open (unless it was very soft). Use your fingers to stretch the frame so that it will fit onto an earwire loop without trying to spring apart.
Find Chandelier Earring Materials
You can find materials to make your own chandelier earrings at a craft or jewelry supply store or online.
Chandelier Earrings Step 3:
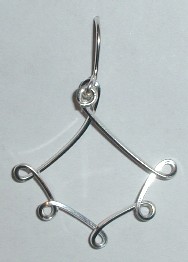
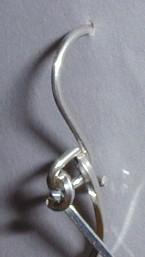
Make an earwire with a loop large enough to accomodate both loops of the chandelier. You can go ahead and attach to chandelier onto the earwire. Open the loop of the earwire as if you were opening a jump ring. Here is the earring before adding any dangles.
Chandelier Earrings on eBay
You can get findings to use for your own chandelier earrings or finished earrings to wear or use as templates.
Chandelier Earrings Step 4:
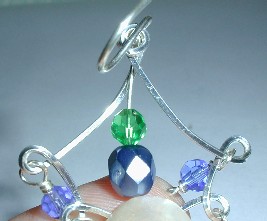
If you are using headpins, string a bead on a pin and use roundnose pliers to form a loop above the bead, which you open and slip onto a chandelier loop. Close the loop with flatnose pliers and repeat until all of your beads are strung. I used a spool of 24-gauge wire. I threaded my beads onto the wire and formed wrapped loops around the chandelier loops. I also formed loops below the beads, since I just really like making loops. You could make spirals or even bend the wire up so that it is invisible under the beads - it's your choice.
Chandelier Earrings Step 5:
I attached my top dangle to the earwire finding and not to the chandelier frame. My dangle hangs from the earwire between the two loops of the chandelier. You could attach the dangle to the front loop of the chandlier, but it may not swing freely (especially if you use square wire). Here's a close-up of the earwire with chandelier, so you can see the space where the dangle will fit.
Chandelier Earrings Step 6:
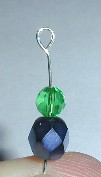
Here's my dangle, ready to be opened and placed on the earwire. I didn't wrap this loop, but made an eye loop instead.
Chandelier Earrings Step 7:
Attach the dangle. I cut the wire below the dangle and used my finger to mark where to make a bottom loop. Make the dangles for both earrings at once, so that they will be the same length.
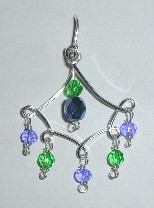
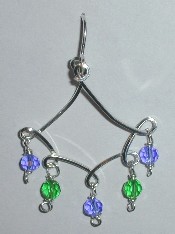
Finished Chandelier Earring
Here's the finished earring. Make a second just like the first and go out to celebrate!
More Earrings to Make
If you enjoyed making these chandelier earrings, then why not try some of my other earring patterns?
- Make Beaded Chandelier Earrings
Chandelier earrings are gorgeous, but large earrings can be heavy and cumbersome and can take a lot of time to make. These earrings have three-dimensional drape and the swingy allure of chandeliers, but they are easy to make and elegant enough to wea - Make Pearl Earrings
Pearl earstuds are a classic fashion accessory, jewelry store staple, and a great gift idea. High quality materials and careful attention to technique will make the difference between heirloom treasures and earstuds that look ill-matched and fall apa - Make Beaded Earrings Using the Coraling Technique
These lacy earrings look like coral or frost. The branched fringe or coraling beading technique is easy to do and yields stunning results. Once you master the stitch you can use it to make necklaces or to adorn clothing. - How to Make Beaded Snowflakes
Beaded snowflakes are fun to make! You don't need any beading experience to make these dainty creations. Make one for a pendant. Two beaded snowflakes could become dangles for a pair of earrings. Make dozens and attach them to winter gifts or use the - Make Beaded Stars or Mandala
Beaded stars or mandalas make great pendants or earring or even holiday ornaments. You don't need any beading experience to create these jewels. Just get some beads, thread, and a needle and give this project a try! The pattern is addictive, partly b
Got questions or comments about this chandelier earring project?
Related

30-Minute Earrings to Crochet - A Collection of Free Crochet Motif Patterns
 for Jewelry or Armor: A How-To")
Making Chain Mail (Maille) for Jewelry or Armor: A How-To

How to Create Polymer Clay Figures for Stop-Motion Animation

★ How to Make Puppets for Stop-Motion Animation | Jointed Limbs and Clay Art Doll Figures ★

How to Make Vintage Style Trumpet Lucite Flower Jewelry


