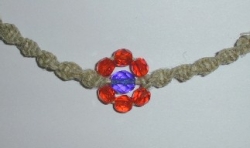
Macrame Flower Necklace

Quick and Easy Macrame Necklace
Macrame is a simple knotting technique that can be used to make cool jewelry. One nice part about macrame jewelry is you can use natural fibers and beads for jewelry that is soft and easy on your skin. Macrame jewelry is also very inexpensive to make. This easy project uses only two knots and doesn't require any complicated measuring! You can make a choker as shown, or knot a shorter length for an anklet or bracelet.
Macrame Flower Necklace Overview
I'm going to show you how to form a spiral using half knots, add the beads which make the flower, and make a simple closure so you can put your jewelry on and off easily. This project is ideal for kids or beginners. It should take less than an hour to complete a necklace.
Macrame Necklace Materials and Planning
Hemp or Cord
I used 1-mm diameter hemp cord. You can use other thickness/types of cord - just make sure your beads will fit!
Beads
I used six 6-mm Czech firepolish beads, one 8-mm Czech firepolish bead, and one 9-mm India lampwork bead.
Knotting Board or Substitute
I used a 3-ring binder and some Scotch tape.
Scissors
Okay, so I used my wire cutters. My bad.
Measuring Tape
Not absolutely necessary, but better safe than sorry.
Glue
Normal white glue is often recommended, but I get my jewelry wet, so I prefer clear-drying Jewel Bond or similar non-toxic waterproof glue.
Hemp jewelry often uses pony beads, shells or other natural beads. My wood beads have huge holes and my stone beads have tiny holes, so I updated the classic look with Czech firepolish beads. However, you can use any type of bead you want, as long as they will fit on a single strand of your chosen macrame cord. You can make the flower have petals all the way around, too... it's an easy adaptation. Also, feel free to make more flowers or to vary bead sizes. Have fun!
First things first. You will need some sort of knotting board on which to make your jewelry. This is important because the cord around which you will be forming the knots (known as the filler cord) must be held straight to keep your work neat. Many people use a clipboard and simply place the first knot under the clip. Some people are comfortable tying the cord to their big toe or to a door knob. I used a 3-ring binder, with a knot/space/knot hooked onto the middle ring of the binder. You can also purchase knotting boards.
To begin, decide what length you will make your jewelry. You'll want a snug (not tight) fit, so simply take the measurement around your neck, ankle, wrist, whatever, to get the finished length. Cut one cord twice this length (this will be the filler cord) and cut two cords four times this length. For example, for a 16" necklace, I cut one 32" cord and two 64" cords (really, I didn't measure that closely... I cut one cord at an arm length and two cords at twice that length. One arm's length for me is about a meter or 36".)
I put the knot instructions on separate pages to help this page load more quickly and so I will be able to refer to the knots in future projects.
Macrame and Hemp Jewelry Materials
Sometimes you can find hemp and cord in a craft store. If you need to order it online, there are many options for both natural and synthetic cord in varying thicknesses. Thin cord makes more supple jewelry; thicker cord may be easier to work with. Here are some materials I found on Amazon. Feel free to add your own recommendations to this list and vote products up/down.

Macrame Flower Necklace Step 1:
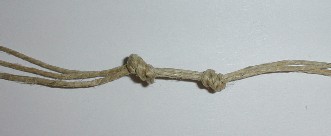
Bring the ends of all three cords flush at one end. Tie an overhand knot using all three strands about 6" (15 cm) from this end. Tighten the knot. Make another, looser overhand knot closer to the short end of the strands. You will probably untie this knot to make it the perfect size for a closure bead at the end of the project. For now, you will use this loose knot to secure your work. Here's what you'll get: the short ends and loose knot are shown to the left and the tight overhand knot and long ends are to the right. Note: If your big bead (center of your flower) allows it, you could use two filler cords instead of one. This allows for more clasp options and let's you work with two cords folded in half (not cut ends). The resulting spiral would be somewhat thicker. It's just something to keep in mind.
Macrame Flower Necklace Step 2:
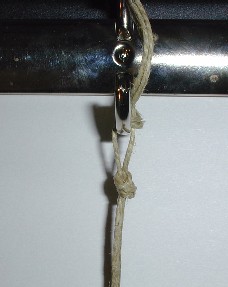
Secure your cords. The photo shows how I hooked the space between these knots on my binder to begin work. I used scotch tape to help hold the filler cord straight (I taped it on the back of the notebook for added security).
Macrame Flower Necklace Step 3:
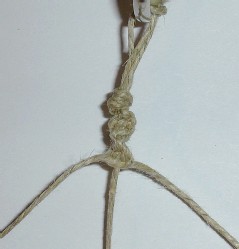
Tie half-knots (e.g., half of a square knot... it doesn't matter whether it's right or left as long as they are all the same... there is a video if you need help) until you reach the half-way point of your jewelry. A string of the same type of knots is called a sinnet. You are tying a sinnet of half knots. The tightness of the spiral will be determined by the cord thickness and the tension you are using in tightening the knots. Tighter tension = tighter spiral. The photo shows what you will get after a few knots. Continue tying half-knots until you reach the halfway point of your jewelry (e.g., for an 8" bracelet, this would be 4").
See How to Tie a Macrame Half Knot
This video is a little quiet, but she demonstrates how to make half knots, which are the knots used in my project.
Macrame Flower Necklace Step 4:
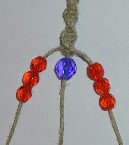
Now you will string the beads for your flower. String 3 smaller beads on each of the knotting cord. String the large bead on the filler cord. Push the beads up to the knots so that they are snug against them. Now, if you had two more small beads, another option here would have been to string one small bead, tie a half knot below this bead, then do the three beads on each of the knotting cords with one on the filler cord, tie a half knot, string another small bead on the filler cord, and resume tying half knots below it. This creates a nice pattern, too! Another variation: if your small beads had large enough holes, you could have strung all three cords through a small bead, done the 3/1/3 flower, then strung all three cords through another small bead, and continued from there. So many options!
Macrame Flower Necklace Step 5:
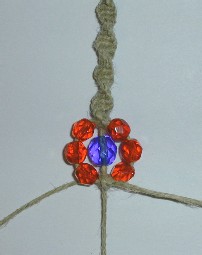
Whatever type of flower you make, you simply resume tying half-knots after the beads have been added. Be careful to have the beads snug against the knots, so that the petals of your flower will bow outward. If you want, you could switch directions of your spiral by tying all of these knots from the other direction (e.g., make sinnet to the flower from the right and sinnet after the flower from the left). Keep going until you reach your desired finished length.
Learn How to Make More Macrame Jewelry


Macrame Flower Necklace Step 6:
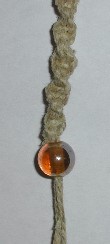
Two half knots tied from opposite sides form a square knot. I like to end the necklace by making the final knot a square knot (more secure), but it isn't really necessary. You could tie knots on top of each other to make a fiber ball, but I selected a bead that all three strands could slide through (barely).
Macrame Flower Necklace Step 7:
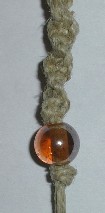
I tied an overhand knot after this bead and used by fingers to snug it up against the bead. The knot was tightened and then glued. After the glue dries, you can cut the cord near the knot (I like the dangling cords).
Macrame Jewelry


Macrame Flower Necklace Step 8:
Now, go back to the loop side of your jewelry. Make sure that the distance between the two knots is enough to allow this bead to pass, but not so big that the bead slips back out. Once you are happy with the distance between the knots (may require retying), glue the knots. Clip the cords, if desired.
Questions or comments about making this macrame necklace project?


