Make a Hemp Macrame and Bead Choker

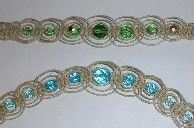
Elegant Beaded Hemp Jewelry
Although the finished look of this hemp and bead choker is very intricate, the fishbone pattern is really quite simple to create. If you can tie a square knot, you can make this look. If you don't know how to tie a square knot, then you've come to the right place since I'll show you how the knot is tied and give you lots of practice with it.
Hemp Macrame & Bead Choker Materials
Hemp or Cord
I used 1-mm diameter hemp cord. I think waxed linen would look very nice, too. You can use other thickness/types of cord - just make sure your beads will fit! The bead carrier cord can be thinner than the other cord, but you want it to be strong enough to support the weight of your beads without breaking.
Beads
You can use beads that are all one size, but I like the graduated hemp rings, so I used multiple sizes (two 5-mm, two 6-mm, two 8-mm, one 10-mm vintage Swarovski round crystals). The beads don't need to be round. Also, you can use more or fewer beads. I think the design works best with an odd number of beads.
Knotting Board or Substitute
I used a 3-ring binder and some Scotch tape. A clipboard works well too.
Scissors
Okay, so I used my wire cutters. My bad.
Measuring Tape
Not absolutely necessary, but better safe than sorry.
Glue
Normal white glue is often recommended, but I get my jewelry wet, so I prefer clear-drying Jewel Bond or similar non-toxic waterproof glue.
Hemp jewelry often uses pony beads, shells or other natural beads, but I wanted to try something a little different. My wood beads have huge holes and my gemstone beads have tiny holes, so I used vintage Swarovski crystals. You can use any type of bead you want, as long as the beads will fit on a single strand of your chosen macrame cord.
First things first. You will need some sort of knotting board on which to make your jewelry. This is important because the cord around which you will be forming the knots (known as the filler cord) must be held straight to keep your work neat. Many people use a clipboard and simply place the first knot under the clip. Some people are comfortable tying the cord to their big toe or to a doorknob. I used a 3-ring binder, with a knot/space/knot hooked onto the middle ring of the binder. You can also purchase knotting boards.
To begin, decide what length you will make your jewelry. You'll want a snug (not tight) fit, so simply take the measurement around your neck, ankle, wrist, whatever, to get the finished length. For a choker, you want three cords each about 8 feet long (about 2 meters) and cut two cords 12-18" long (about half a meter). The long cords will be folded in half and used for the actual knotting of the design. They will serve as both knotting cords and filler cords. One of the shorter cords will be used to tie on the jewelry. The other short cord will be the carrier for the beads. Obviously, you will want shorter cords for bracelets or anklets. Just keep in mind that it is easier to work with too-long cords than it is to add more cords if you make your initial strands too short.
Find Materials for this Project Online
You need hemp or other cord, beads, and really that's about it. Some people tie cords to their toes rather than use a clipboard or notebook. Another option for a knotting board is to tie your project to a door knob. Use whatever works!


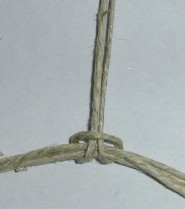
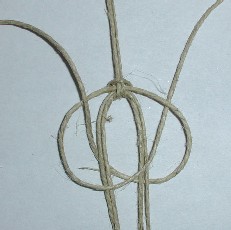
Hemp Beaded Choker - Step 1
Set one short cord aside for now. Fold one short cord in half. Align the three longs cords and find their mid-point (I just folded them in half). Secure the middle of the three long cords with a lark's head mounting knot, which is made by slipping the loop of the folded short cord under/behind the set of three long cords and putting the loose tails of the short cord through the loop.
Larkshead Knot Tutorial Video
Here's how to tie the larkshead knot. In this project you are tying the knot around three sets of cords rather than around a wooden dowel.
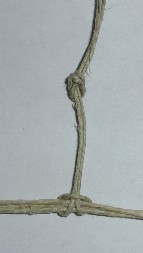
Hemp Beaded Choker - Step 2
If desired, tie an loose overhand knot about the lark's head knot to leave yourself an opening so you can secure the hemp to a knotting board. I tied the piece photographed for this tutorial taped to a piece of printer paper and my desk using Scotch tape! As you can see, fancy workspaces really aren't required.
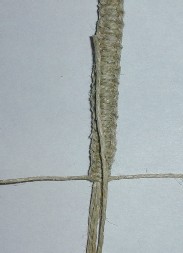
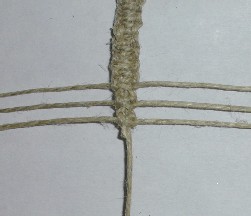
Hemp Beaded Choker - Step 3
Now, you have two short strands above the lark's head knot (top of the work) and six long strands below it.
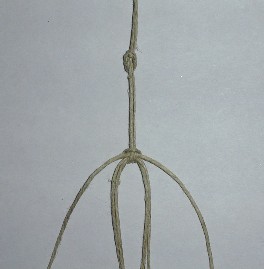
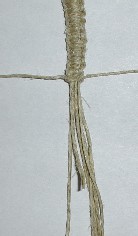
Hemp Beaded Choker - Step 4
Tie square knots using two of the long strands, with the other four knots acting as filler cords. For my choker, I tied 20 knots, or about 2". You will want fewer knots and/or fewer beads for a bracelet or anklet.
Video of How to Tie a Square Knot
It's probably easier to watch a video of how to tie a square knot than to look at photos, so here you go!
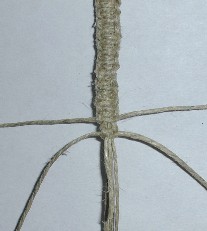
Hemp Beaded Choker - Step 5
Now, add the cord that will be the bead carrier. To do this lay the remaining short cord on top of the filler cords, parallel to them and extending an inch or two over the knots that you have tied so far. Use your knotting cords to tie a square knot around this new cord as well as the four filler cords.
Hemp Beaded Choker - Step 6
Bend to extended portion of the short cord down over this knot. Tie four more square knots over the end, the fillers, and the bead carrier strand. I had a total of 25 square knots once the carrier strand had been secured.
Hemp Beaded Choker - Step 7
Now, start to make the fishbone pattern. The first step is to form three pairs of knotting strands. Start by laying your knotting cords out perpendicular to the work. Take one pair of filler cords and tie a square knot about the other pair of filler cords and the bead carrier cord.

Hemp Beaded Choker - Step 8
Lay this new pair of knotting cords out perpendicular to the work.
Hemp Beaded Choker - Step 9
Take the last pair of carrier cords (the long cords) and tie a square knot around the bead carrier cord. Lay these knotting cords out to the side.
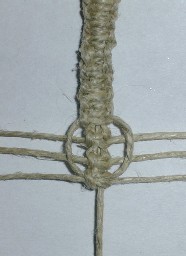
Hemp Beaded Choker - Step 10
Starting the Fishbone Pattern
Take the top (first) set of knotting cord and tie a square knot around the bead carrier cord. This side of this knot will loop out a bit. You can try to make all of your loops the same size of you can make this loop small, with larger successive loops. It's up to you! Once you have tied the square knot, lay the knotting cords out to the side.
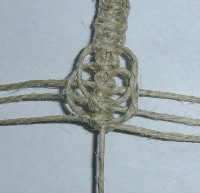
Hemp Beaded Choker - Step 11
Use the top knotting cords (the second pair) to tie the next square knot. Now you have two loops of your fishbone pattern.
Hemp Beaded Choker - Step 12
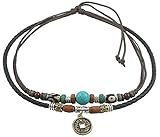
Start Adding Beads
Use the top knotting cords (third set) to tie a square knot and make another loop. I continued in this manner until I had seven loops. Make as many or as few as you like (at least three, though, to set up the cords). Slide the beads onto the bead carrier cord (hopefully you checked to make sure they would fit before adding the bead carrier cord!). The order of my beads is 5-mm, 6-mm, 8-mm, 10-mm, 8-mm, 6-mm, 5-mm. Slide the first bead up to your work and leave the others toward the bottom.
Books about Hemp Jewelry
Learn how to make more hemp jewelry!
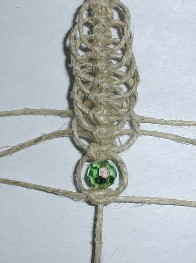
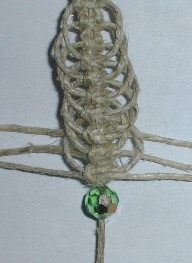
Hemp Beaded Choker - Step 13
Forming loops around the beads is a bit different from making standard fishbone loops. Tie a square knot with the bottom pair of knotters, then the second set, and finally the top set.
Hemp Beaded Choker - Step 14
Each loop should be slightly larger than the one before it.
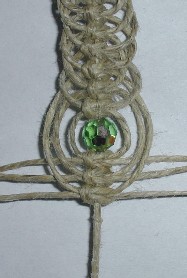
Hemp Beaded Choker - Step 15
Slide the next bead up to the work. Repeat the process: tie the bottom knotters, the second set, then the top set. Continue until all of the beads have been used. Note: some people like to flip their work after the large center bead. I didn't, but this produces a nice effect (try it to see!).
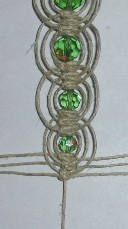
Hemp Beaded Choker - Step 16
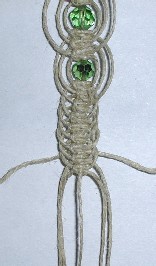
Once you have tied the third loop around the final bead, it's time to make more loops the 'old' way. Use the topmost knotters to tie a square knot. Use the new top set of knotters to tie the next square knot, etc. I did this until I had six loops (not seven).
Hemp Beaded Choker - Step 17
Same Thing, Except in Reverse!
After the sixth loop, lay all of the cords, except the top knotters, alongside the bead carrier strand. Tie a square knot over all of these strands (which also creates the seventh loop).
Hemp Beaded Choker - Step 18
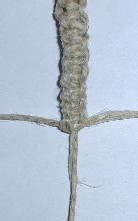
Now you will tie square knots (25, in my case). I kept reducing the number of filler strands. I cut them at staggered lengths and knotted around them until only the two knotters and two carriers remained. There are a couple of ways to deal with the bead carrier. You don't want it to slip (which would lose your beads). You can make the bead carrier serve as a filler for the remainder of the piece. However, I like to tie a slipknot in the cord (after I have cut a few other filler cords) and knot (tightly) over this knot. After this, you can cut the bead carrier and hide the end. I tied my 25th square knot very tightly and glued point where the knotters left the piece. Once the glue had dried, I cut the knotters off close to the work. This left a pair of carriers to match the top strands.
Hemp Beaded Choker - Step 19
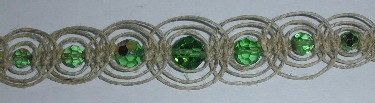
Here's the center of the finished choker. It's probably obvious to you at this point: larger beads produce larger loops; stiffer cord produces firmer loops. If you like, you can run your work over beeswax to smooth down any 'fly away' pieces.

Hemp Beaded Choker - Step 20
Last Step - Congratulations!
For decoration, I added a 5-mm crystal to each strand. I tied an overhand knot below the beads and applied glue to the knot before cutting it. If you slide the bead down to the knot while the glue is wet, you can affix the bead to the end of the strand. My choker simply ties on, so it is adjustable. My choker measures ~14 inches in length, from the lark's head knot to the last square knot, plus several inches of cord for tying. Your finished length will depend on the thickness of cord used, number of beads, tension, and how many knots you tie.
Questions or comments about this hemp choker project? Here's the place for them!


