Make Beaded Chandelier Earrings


Easy-to-Make and Pretty Chandelier Earrings
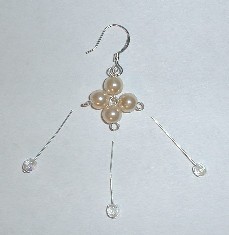
Chandelier earrings are gorgeous, but large earrings can be heavy and cumbersome and can take a lot of time to make. These earrings have three-dimensional drape and the swingy allure of chandeliers, but they are easy to make and elegant enough to wear anytime. I've made mine with pearls and crystals, but you can use other beads too.
Chandelier Earrings Overview
This is an excellent beginner bead and wire project that can be completed in less than an hour. If you are a more experienced beader or wire worker you probably already have the beads, findings (metal pieces), and basic tools needed to make chandelier earrings. Beginners may want to visit the craft section of a store to pick up the necessary materials. If you have any questions, please feel free to post a comment and I'll reply.
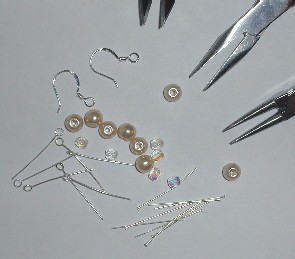
Chandelier Earrings Materials
I've listed the materials I used when I took the photographs, but other shapes and sizes of beads work well too.
Beading Wire -OR- Eyepins, Headpins
20, 22, or 24 ga, soft or half-hard
6-mm Pearls
Works well with 4-mm beads too
4-mm Crystals
Earring Findings
Earwires are shown, but you can use whatever types of earrings you like.
Wire Cutters
Round Nose Pliers
Used for making loops.
Flat Nose Pliers or Chain Nose Pliers
For opening/closing loops.
The white pearl earrings shown in the photo were made using beads, earwires, and a spool of wire. I had strung all of the beads onto a spool of 24 gauge wire (6 crystals first, since they are the last beads on the earrings, then 8 pearls) and then made wrapped loops to connect all of the beads. For me, this is less expensive and more convenient than using pre-made eyepins and headpins and wrapped loops are very secure. However, I suspect many people reading this tutorial will be more comfortable using eyepins. Therefore, I've given instructions for a wrapped loop first, then completed the project with eyepins and headpins. If you are making the earrings using wire, simply repeat the wrapped loop instructions for all of the beads. If you are making eye (rosary) loops instead of wrapped loops, choose 20 or 22 gauge wire, as 24 gauge wire may not be sturdy enough.
Chandelier Earring Materials
Sometimes it's challenging to find jewelrymaking materials locally. I've started a list of materials available online that may help you. If you find something I've missed, be sure to add it to the list.


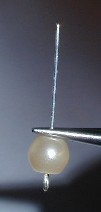
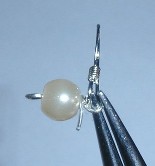
Chandelier Earrings Step 1:
String a pearl onto an eyepin. Use your round nose pliers to grasp the pin just above the pearl. In the photos, I added the earring finding after I had made the loop, but in reality I put the earwire on over the pearl and made my loop in one movement because I get better shaped loops that way (and it's faster). However, some people find their loops are better if they make the main shapes first and then add the finding. It's a matter of personal preference.
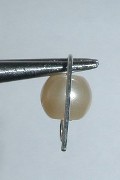
Chandelier Earrings Step 2:
Use your fingers or the pliers to bend the pin forward until it touches the pearl. Notice that I have bent the wire straight toward me so that the loop I am making will be parallel to the eyepin loop. Pay attention to details like the orientation of your loops. Do you want them to be parallel? Perpendicular? With the openings on the same side of the bead? Opposite? Sometimes it will matter which choice you make. Even for projects where the orientation of the loops makes no difference, try to be consistent, as this will add polish and professionalism to your work.
Chandelier Earring Step 3:
If you haven't already added the earwire, do so now. I made a wrapped loop, but you could make a simple loop if desired.
Chandelier Earrings Video - Step by Step Chandelier Earrings
Here's a video that shows another pair of chandelier earrings that you can learn to make.
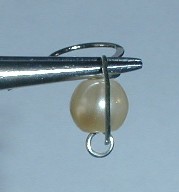
Chandelier Earrings Step 4:
Using your round nose pliers, bend the back of the loop back toward the pearl (otherwise your loop will have one round side and one flat side). To wrap a loop, grasp the end of the pin with your fingers or flat nose pliers and bend the wire around the top of the pearl. The bending and wrapping actions can be completed in the same motion. Make a simple loop, single wrapped loop, double loop, or whatever pleases you. Cut the end with your flush cutters. If you have an end that needs pushed in with your flat nose pliers, be very careful not to damage the nacre of your pearl. If this is your first time making loops don't feel discouraged if they don't turn out perfectly round! It can take lots of practice to make round loops.
Chandelier Earrings Step 5:
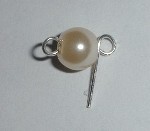
Add three pearls to the bottom loop of the first pearl. To do this, string the pearls on eye pins and form loops to hang them on this bottom loop. You can make loops first and then open/close them like jump rings to add them to the earring or you can string the wire of the eyepin/pearl onto the earring and form the loop directly (my preference).
Chandelier Earring Materials and More
Amazon has some materials (findings) for making your own chandelier earrings as well as some lovely finished earrings.
Chandelier Earrings Step 6:
You can make a simple eye or rosary loop the same way as a wrapped loop, except you don't pull the wire around into a circle. Here's what a simple loop will look like before you cut it.
Chandelier Earrings Step 7:
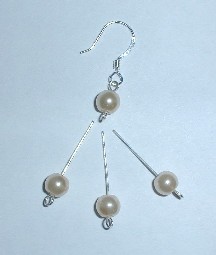
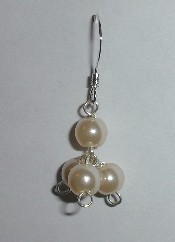
Once all three pearls have been added to the top pearl, your earring will look like this. The pearls form a natural pyramid shape. Pretty cool!
Chandelier Earrings Step 8:
Finally, loop a crystal onto each of the three bottom pearls. In my example photo of finished earrings at the top of this page, I made loops below the crystals using wire. You would get this look if you used eyepins for this step, too. Here, I'll show you what you get if you use headpins instead. String a crystal onto a headpin and form a loop. Add it to a pearl.

Chandelier Earrings Step 9:
Make a second earring to match the first. Pretty!
Questions or comments? Sign here!


