Make a Japanese Chain Maille Necklace

Easy Chain Maille Necklace Project
Call it chain maille or chain mail or call it jump ring jewelry - the technique is easy and the results are stunning! This necklace, based on a Japanese motif, is a great beginner project. It doesn't take too long to complete, doesn't involve contortionist positions to make the motifs (we'll save that brand of fun for another time), yet uses several techniques that you can apply to make lots of different designs. Let's do it!
Japanese Chain Maille Necklace Overview
This project is easy enough that a beginner can get great results, but your skill will improve with practice. I recommend starting out with inexpensive wire, like copper or brass, with glass beads. Save the silver or gold and pearls or precious gems for your second necklace.
Expect this project to take a couple of hours to complete. You can make this necklace in an evening or over a weekend. If you buy pre-made jump rings, you can complete this project very quickly.
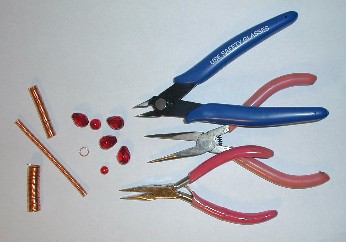
Chain Maille Necklace Materials
Wire
Dead soft (my preference) or half hard. Do not attempt to make jump rings using full hard wire, as they will be very brittle and susceptible to breaking. If desired, you can anneal wire to regain its malleability. Gauges 21, 20, and 18 are most commonly used. I used 20 gauge wire for this project. This design used up most of a 25-foot package of 20-ga copper wire.
Wire Cutters or Jeweler's (Hack) Saw
If you are using wire cutters, make sure they make a flush cut on at least one side. If you are using a saw, make sure the blade can cut the metal you are using.
Mandrel
You can purchase mandrels or use skewers, chop sticks, knitting needles, dowels, or anything else that you can wrap the wire around and then slide off as a coil. Try rods with different shapes for non-round jump rings.
Two sets of smooth and flat jaw pliers
It's theoretically possible to do it with one pair, but you will save a lot of wear/tear on your fingers if you use two sets instead of fingers for opening/closing j-rings. I can't open/close the smallest jump rings with my fingers.
Dangles - Optional
Clasp
I made my own using 18 gauge wire. It's best to use a large diameter wire for a clasp, such as 16 or 18.
Here's a look at the materials I used for this project. First, buy or make the jump rings. You will need three sizes. I used 20 gauge wire with three sizes of jump rings, with internal diameters of approximately 8 mm, 5.5 mm, and 2.5 mm. You can experiment with different diameter rings (different shapes, if you like!) and different gauges of wire. If you change the wire gauge, remember that as your wire gets thicker, you need to be more careful to check that the smaller rings will accommodate the larger rings. As your wire gets thinner (larger gauge number or smaller millimeter number), the rings will get weaker and more prone to opening or changing shape. Once you have the rings, the Japanese motifs are assembled first, then they are attached with a simple jump ring chain to make the desired length. The clasp and dangles (optional) are added last.
Chain Maille Necklace Step 1:
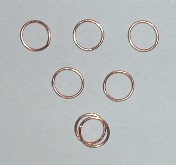
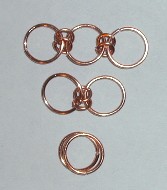
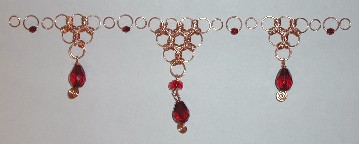
First assemble the Japanese motifs. The motifs use the largest and smallest rings only. First close the largest jump rings. If desired, solder or fuse them closed. You will need 6 large rings for each motif (assuming you make it 3 rings, descending to 2 rings, descending to 1 ring). Open up a lot of the smallest jump rings. They will be used to join closed rings of the other two sizes. I've laid out the large rings for a single motif. I like to make the 'rows' of the motifs first and join the rows on the diagonal after they have been completed.
Chain Maille Necklace Step 2:
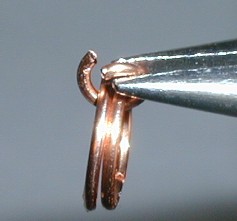
Join the rings by holding two closed large rings together with your fingers. Now, pick up an open small ring with either your fingers or your pliers. Close the small ring, but don't set the rings down. Keep hold of the rings with one hand/set of pliers and pick up a second open small ring. Position it next to the first small ring and close it. Complete this process with the other rings to complete the rows.
Chain Maille Necklace Step 3:
Lay the rows out. Connect the first ring in row 1 to the first ring in row 2. Now, connect the second ring in row 1 to the first ring in row 2! There's a 'trick' to doing this easily...
Chain Maille Books and Patterns
These are books about making your own chains and chain maille jewelry.


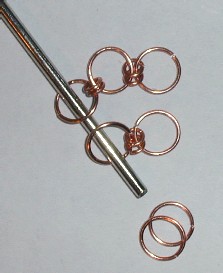
Chain Maille Necklace Step 4:
Line up the rings to keep them straight and then insert a thin dowel into the two rings to be connected. Pick up the chain by the dowel and insert the tiny jump rings. I used the mandrel for making the small jump rings, but any thin rod or stick will work. If at any time you get confused or lose your place, just lay the rings down to re-arrange them.
Chain Maille Necklace Step 5:
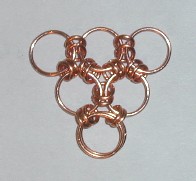
Here's a finished motif. Japanese chain maille is really versatile. You could make any size triangle or even hexagons, if desired. Make three of the motifs (or as many as you want for your necklace). Note: I doubled the large bottom ring of each motif to provided extra security for the dangle. Feel free to play with the design. You could use single rings or triple rings. Experiment mixing different colors or wire. Perhaps you want to string beads onto the rings before closing them (size 8 seeds beads work great, as do most magatamas and drops). Explore your options! I attached dangles to the motifs. The dangles on the necklace in the top photo use large freshwater pearls. For them, I used 22 gauge wire, since it was the largest wire that would fit through the holes in the pearls. However, I used coiled wire dangles for the necklace you see in this tutorial.
Chain Maille Necklace Step 6:
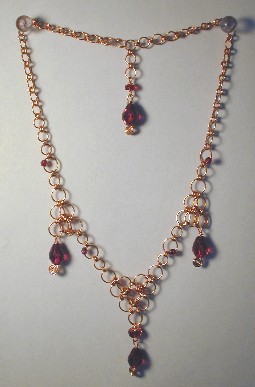
The hardest part is done! Once you've completed your motifs, lay them out and plan your chain. Yes, I made a central motif that was 4-across... I hate making the same style of anything more than once! I went ahead and added my dangles.
Chain Maille Necklace Step 7:
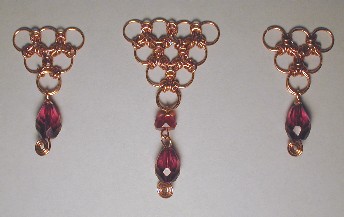
Now, you will connect the motifs using the smallest jump rings joining the medium size jump rings (and maybe a few larger ones, added in to spice up the design). Go ahead and close your medium-size rings. You may wish to add seed beads or drops to your medium rings before closing them. The simplest type of chain connects two of the medium jump rings with a single small jump ring. That's great if you plan to solder your links or are using very thick wire, but if you aren't, I highly recommend using two or three small jump rings to connect the medium rings. I connected the medium rings using two small rings, which is how I connected my motifs. Continue to add chain to the ends of the joined motifs until you have reached your desired length. I made a simple S-hook clasp by wrapping my wire around my roundnose pliers. The hook fits into the medium rings, so I can adjust the length of the chain at will. I added a decorative drop to the end of the chain.
Chain Maille Necklace Step 8:
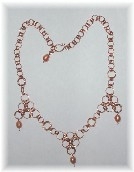
Here's the completed necklace. It kinda has a Goth look to it, don't you think? Now you have learned several basic skills used to make chain maille jewelry.
Questions or comments about this Japanese chain maille necklace?


 for Jewelry or Armor: A How-To")


