Make Beaded Bobby Pins


Pretty Beaded Bobby Pins!
Make your own beaded bobby pins or barrettes. All it takes is a few beads, some wire, and the pins/barrettes to make bejeweled creations worthy of becoming heirlooms! Beaded bobby pins are great for weddings, formal events such as the prom, gifts, or to add a little sparkle as an everyday accessory.
Beaded Bobby Pins Overview
This is a good beginner bead and wire project. Even though the bobby pins look ornate, they are easy to make.You can expect each pins to take 15-30 minutes to complete, depending on your experience level and how intricate you make the beadwork.
Beaded Bobby Pin Materials
I listed the exact materials that I used for this project, but you should feel free to experiment with different types of beads and other materials.
Materials - Comments
Beading Wire - May substitute Power Pro or nylon monofilament. Thin wire is the easiest wire to work with, in my opinion.
Size 5 Miyuki Triangle Beads - Silverlined beads used in the example. Squares or rectangles work well, too.
Size 11 Seed Beads - Matsuno silverlined crystal used in example.
Bobby Pins or Barrettes - For barrettes, use narrow size.
Wire Cutters or Nippers - Flush cutters preferred.
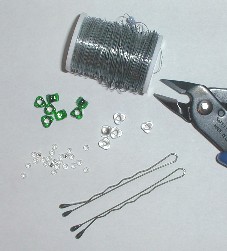
First, a few notes on materials: The beading wire I used was 32 gauge craft wire. You could also use 24, 26, or 28 gauge wire, but if you increase the wire size, you need to be mindful of the hole size of your beads. Also, heavier wire could make your hair ornament look or feel bulky. You could also use a strong stringing material instead of the wire. The only difference in the instructions is that you knot and tie off the thread and weave it back into the work, as opposed to simply wrapping/cutting wire. I like the sparkle of the Miyuki triangles, but any beads with at least one flat side (facing the pin or barrette) will work. Experiment with pearls or crystals, too. They won't lie flat against the metal, but the effect is a bit more three-dimensional and quite beautiful.
Here's a photo of all of the materials you will need to complete the hair jewelry. In this example, I have made beaded bobby pins, but you can use the same technique for narrow barrettes.
Beaded Bobby Pins Step 1:
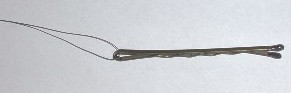
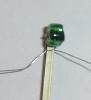
Cut about 3 feet (1 meter) of fine gauge wire. String the wire through the inside of the pin and center it. Wrap the wire around the base of the pin by crossing both sides of the wire over the top of the pin and under it. You will end up with one wire on each side, facing 'up' or toward the top of the pin, so that you can begin beading it. Keep a tight tension on the wire so that there are no gaps between the wire and the pin.
Beaded Bobby Pins Step 2:
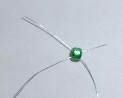
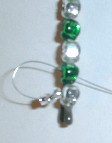
Now bead the top of the pin. I have alternated between a colored triangle bead and a silverlined clear bead. Add a bead by crossing the wire through the bead, as shown in the picture (I put the bead on one wire then run the other wire through it).
Beaded Bobby Pins Step 3:
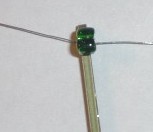
Tighten the bead down onto the top of the bobby pin so that one flat side is flush against the pin. Cross the wires under the bead. Avoid crossing the wires under the entire pin, which would make it impossible to open!
Make More Beaded Bobby Pins

Beaded Bobby Pins Step 4:
Next cross the wires over the top of the pin (without a bead) and underneath it. This is done to advance the wire a bit so that the beads won't bunch up. It keeps the wire spacing even and results in a more attractive finished piece. Now, add your second bead (silverlined clear), crossing under it, performing a non-bead wrap, add another bead, etc. Work until the top of the pin is covered.
Beaded Bobby Pins Step 5:
Here's a picture of the underside of a pin, so that you can see the wirework (great macro on that camera, huh!).
Beaded Bobby Pins Step 6:
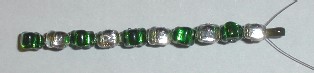
Here's what the pin will look like after you have added the triangle beads. You may wish to end the pin here (wrap the wires several times, run them through the beads to hide the ends, and cut them). At this stage, the beads line up in a nice, neat row. I have embellished this pattern with a single line of seed beads.
Beaded Bobby Pins Step 7:
To embellish one side only, wrap one wire securely around the pin, run its end through a top bead, and cut the wire. If you wish to work embellishment on both sides of the beads, keep both wires long and simply work one side at a time. Run a wire back through the last bead, add three seed beads (or 5 or whatever number pleases you), run the wire through the hole of the next triangle beed, add seed beads, run the wire through the hole of the next triangle bead, etc. When you get to the end of the pin, wrap the wire around the bobby pin, run the end through a bead, and cut the wire.
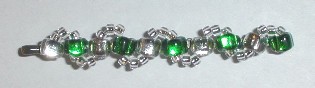
Beaded Bobby Pins Step 8:
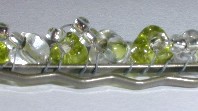
Here's the finished pin. You can alter the look of the pin by adjusting your wire tension. A lighter tension will allow the triangle beads to remain lined up. Using a tighter tension when embellishing the pin will bend the triangles toward each other. Both effects are attractive. Enjoy your bobby pins or barrettes!
Questions or comments about beaded bobby pins? Tell me what you think!